Drill Use Instructions

for Surgical Implants


Let's see!

Implant Bed
Preparation

Drill Protocol

After opening the gingiva,
the implant bed preparation
begins with the preparation of
the alveolar ridge.


• Prepare alveolar ridge and
mark implant position
• Carefully reduce and smooth
a narrow tapering ridge


• Prepare the implant bed with
the correct drill bit to full depth
corresponding to the implant
diameter and length chosen
• Check the implant axis
• Correct the implant bed
position, if necessary

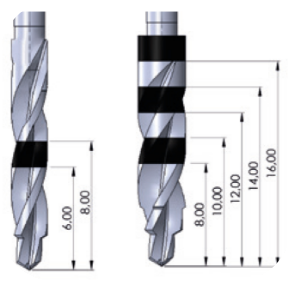
The first bold mark on the Ø 2.8, 3.2, 3.7, 4.2, 4.7 and 5.2 mm drills represents 8 mm and 10 mm, whereas the lower edge of the mark corresponds to 8 mm and the upper edge to 10 mm.

The second bold mark on the drills represents 12 mm and 14 mm, whereas the lower edge of the mark corresponds to 12 mm and the upper edge to 14 mm.

The third bold mark on the drills represents 16 mm at the lower edge of the mark.


Drill
Protocol


• Prepare alveolar ridge and
mark implant position
• Carefully reduce and
smooth a narrow
tapering ridge


• Prepare the implant bed with
the correct drill bit to full depth
corresponding to the implant
diameter and length chosen
• Check the implant axis
• Correct the implant bed
position, if necessary


• Widen the implant bed with
the final drill of the implant
system being placed


Drill
Protocol


• Prepare alveolar ridge and mark
implant position
• Carefully reduce and smooth a
narrow tapering ridge


• With the Ø2.0 mm drill, mark the implant
axis by drilling to a depth of up 6 mm by
using the marker ring
• The only bold mark on the drill Ø2.0
represents<6 mm and 8 mm, whereas the
lower edge of the mark corresponds to 6
mm and the upper edge to 8 mm
• Check the implant axis
• Correct the implant position if necessary


• Widen the implant bed with a larger
diameter drill bit now going to full depth
corresponding to the implant diameter
and length chosen
• If necessary, correct the
implant bed position
• The diameter of the drill bit is smaller
than the final drill being used in Step 4


• Widen the implant bed with the
final drill bit of the implant system
being placed
• The instrumentation depends on the
implant type, the endosteal implant
diameter, and the bone class

Immediate placement
in extraction sites


• Start with the round bur
to create a purchase point
at the apical part of the
extraction socket
• Optionally, start with the
Ø2.0 drill in palatal
direction
• Straighten the drill
direction to the intended
implant bed axis. Drill
2 to 3 mm only,
maximum to 6 mm


• S Pre-drill the implant bed with the
Ø2.0 drill to mark the implant axis
on the palatal side of the
extraction socket. Potentially
direct palatally and re-direct after
1-2 mm into implant direction
• Always apply lateral bur
pressure towards palate
while drilling
• Insert an alignment pin
Ø2.0 mm to check for correct
implant axis orientation and
preparation depth
• Widen the implant bed with a
larger drill and correct the
implant bed position if necessary


• Widen the implant bed with
a larger diameter drill bit now
going to full depth
corresponding to the implant
diameter and length chosen
•If necessary, correct the
implant bed position
• The diameter of the drill bit
is smaller than the final drill
being used in Step 4


• Widen the implant bed with
the final drill bit of the implant
system being placed
•he instrumentation
depends on the implant type,
the endosteal implant
diameter, and the bone class